Image Map

Sunday, April 17, 2016

Engaging Audiences


Long time no see friends! This school year has flown buy and I cannot believe that I am 2 weeks away from state testing! We get out of school on May 20th and our state testing begins on May 3rd, which means I have been in test prep crunch mode for the past few weeks. 

On-demand writing may or may not be the death of me. 5th grade students in Kentucky are testing on  reading, social studies, math and the dreaded on-demand writing. One of the biggest problems I've been having my with students this year is using the correct tone and word choice for the audience that they are writing to which is why I knew I had to find something to engage them with. 

I went to work researching some ideas on what I could do to have my students be engaged in their writing and be working on writing to the appropriate audience. I found an awesome lesson where students were to pretend that they were in the cafeteria and a food fight broke out. Their task was to describe this event to their teacher, their parent and their friend. 


This idea seemed great to me, but I still wanted there to be a deeper level of engagement. So, I started looking for videos on Youtube where there were food fights in the cafeteria and I found the perfect one.  There is a scene from the Bratz movie that shows a complete food fight and my kids LOVED watching this. 
 
In my room I paired kids up and had them watch the video on our Chromebooks, there was so much laughter that you would have never known we were doing writing! After they watched the video they had the job of describing the event to their best friend, principal or parent. Each group was assigned a different audience to write to. 

Before we actually began writing we discussed word choice, tone and the appropriate choices for each audience. I gave them a graphic organizer to use that I purchased from Butterflies and Daydreams. 

After every group had a chance to write to each audience we shared and then compared and contrasted the way we wrote to each audience. My students then had the chance to edit the opinion piece that we were working on at the time. 

If you would like to see the original lesson you can find that here.


I have also put some samples of my student writing on a Google Doc. If you do this lesson in your class please add on to the Google Doc so my students can see other ways to write to specific audiences!

Monday, March 28, 2016

Google Forms

Let me tell you friends, that Google Classroom has changed my life. What is amazing to me is that I know that I don't utilize Google to its fullest potential and its already made my life ten times easier. A bonus, my students love using technology as much as I do. 
One of the most useful parts of Google Classroom for me would be the quick checks, exit slips. and assessments that can be utilized with Google Forms. They can even grade themselves with the help of Flubaroo! 
Recently, I have been using Google Forms to have Flashback Friday's in my classroom so we can quickly and easily review for our state testing. One bonus with Google Forms is that you don't have to be a 1:1 classroom! I have 6 desktops and 4 Chromebooks in my classroom and my students easily rotate through the computers to complete Flashback Friday's each week. 


First things first, you have to create a new Google Form to get started. Once you are in your Google Drive, go to the orange/red "new" button, go down to more and then Google Form will be the first option. This will create a new Google Form in your Google Drive and it will open in a new window. 

After you have created your form, you can add a variety of questions to your document. If you are wanting your form to be automatically graded, you must only use multiple choice questions. Using Flubaroo to grade you also have the option to choose some questions to be hand graded. To add new questions, use the addition symbol on the tool bar on the right of the page. Then you may use the drop down menu to choose what type of question that you want. 

To set your form to be automatic graded you first must click on the 'responses' tap at the top of the form while in editing mode. This will allow you to click the green 'create spreadsheet' button which is where you will make your form gradable. 

In this spreadsheet you will be able to see all of your students responses, and once you set Flubaroo to grade you will be able to see their score, and which questions might be an area of concern. First, you must download Flubaroo as an extension, you may do that here. 

To enable Flubaroo, click on the 'add-ons' tab of your spreadsheet, go to Flubarro and click on 'enable flubaroo in this sheet' now Flubaroo will be able to grade your students responses. 


One important thing to remember when you are setting up your form is to go to the gearshift on the top right side when you are in the editing of your form. When there, make sure to check the box that says 'automatically collect respondents username' that way, you can e-mail them their score from Flubaroo as well as see each students response. I always check the box that says 'can submit only 1 response' unless I want my students to take the exit slip multiple times. 
Back in your spreadsheet, to set up automatic grading you must indicate which question will identify students, if you checked the box that says 'automatically collect respondents username' in your form setting then this should already be done for you. 
Once you have told Flubaroo how to identify your students, you must go through all of the questions and indicate their point value and if they are normal grading or need to be graded by hand. 

Next, you need to tell Flubaroo who has given the correct answers, to do this you must complete the Google Form first, with the correct answers, and then choose your own username to be the answer key. Then Flubaroo should be ready to grade for you! 


One of my other favorite features is the 'responses' tab in the editing view of your form. This will allow you to look at each individual question in your form to see how your students did. I use this to share with my students how they did on the Friday Flashback and to discuss the correct answer. 

I hope this quick Google Form tutorial was helpful to you! It has really changed the way that I assess my students. If you have any questions feel free to email me by clicking here! 

*I recently found this video that explains how to use Flubaroo and google forms! 

Sunday, March 13, 2016

March Pinterest Pick 3


This week I am linking up with Inspired Owl's Corner for the March Pinterest Party. Pinterest is a go to resource that I use when I need to get the creative juices going. More often than not I find exactly what I am looking for, or I get an awesome idea while searching around. 


I've said it before and I will say it a million more times, Jennifer Findley from Teaching to Inspire is one of my all time favorite teacher bloggers. When I am looking for a holiday themed resource, she is the gal I go to and for March she came through! 


One of may favorite resources that she provided for March was FREE! I love to incorporate picture books into my 5th grade classroom and Jennifer provided resources for March themed picture books. My students love to use them during the Daily Five for word work. 

I also have almost all of her St. Patrick's Day task cards for math and the writing centers. My students love them! 


Another awesome resource that I found on my Pinterest search was from Amber at Peppy Zesty Teacherista. 


She has so many resources for the book "Fiona's Luck" which is one of the books that Jennifer Findley blogs about. I love that she provides QR codes which totally engage my 5th grade students. With both of these resources from Jennifer Findley and Amber I've been able to us Fiona's Luck in my word work center all month. 


For my last Pinterest find I found an awesome idea for a student gift on St. Patrick's Day.


I found this back to school Lucky Charms cereal bag topper from Third Grade Thoughts and I knew that I had to so something similar for my students. So I created St. Patrick's Day bag toppers to put on the cereal instead of back to school toppers. 


I also wanted my students to have an authentic task that they could complete while eating their cereal so I created a writing prompt for them to complete as well. You can find this resource here. 

Sunday, February 28, 2016

Project Based Learning


Let me start off by getting something off of my chest. I have seen a lot of talk on Instagram and Periscope (which I love both and love communicating with other teachers) about making sure that you are a maker not a taker. 5th grade where I teach is not departmentalized, so I teach math, reading, writing, science, social studies and on top of that tier 3 reading and tier 2 math. That is a LOT of planning and I don't have a lot of time. So if I see something awesome on Instagram, Periscope or someones blog I'm going to use it, right? That's why teachers share isn't it? 

What I am about to write about was not my original idea (I wish I was clever enough to come up with this) it came from Teaching With a Mountain View.  When I began learning about PBL I knew that this idea was one that could easily be adapted to fit my students needs from year to year and one that they would LOVE. 


Like you've heard me say before, I love teaching social studies and the Revolutionary War but sometimes life can get too routine in 5th grade and we have to spice things up a bit. This is where our magazines came into play. We had spent about a week looking at the different text structures of informational text as well as text features and we were finished with our American Revolution unit. Then came in the fun part. Our Principal came to us looking for some help. She wanted to add some cool student work to our website and knew we could handle the job. She didn't care what it was, just something to add to the website for parents to look at. 

Once she left, my students began a Know and Need to Know List. What did they know about what our principal wanted and what did they need to know about what she wanted. They then began sharing ideas and with some sneaky leading from me my students decided they wanted to create magazines about The Revolutionary War. To get my kids to this point I showed them the blog post from Teaching With a Mountain View so they could get some ideas about what they wanted to do. 
I used the planning sheet that can be found on the original post for my students to begin planning their magazine. To make this idea work for my class and my students I made a few changes to the planning sheet. I had about 5 kids who had to complete all of the aspects of the project. 4 who only had to do 3 articles and then a group of 3 students who worked together and a pair of students who worked together. I knew this would work better with the time frame that we were working with and the quality of work I expected for my students. 
After my students had planned their magazine articles we spent some time as a class deciding how long this would take us and how we would make sure to get this project done in time. From the Buck Institute I found this awesome project planner. This allowed my students to plan out from day to day what they wanted to get done on their magazine to meet the deadline. I have found that with a project this big planning each day and setting goals was very helpful to keep us on track. You can click on the image below to get your own copy of the project calendar. Buck Institute also has a ton of free PBL resources as well. 


Then it came down to the student work. Students spent time writing rough drafts of their articles, and then typed them all on a Google Doc to upload to our Google Classroom website. This made it so easy for me to give feedback to students when I got to school in the morning or each night. Google Classroom really kept our project flowing nicely and students were able to have independence on what steps to take next on their project. 

Students set their own goals daily and moved at their own pace. After I gave the OK on all of their magazine articles, they then moved on to creating their Magazines. We started off using the website MadMagz but quickly found that it wasn't as user friendly as I first though. Then we quickly moved to FlipSnack. As students began working on putting their magazine together I met with them in small groups to give them a quick tutorial on how to use the website, but they quickly became experts themselves. One tip I do have for Flipsnack is to have your students all use one account, I did not do this and now we will be unable to print all of our magazines because the premium account costs $36. 


As students began to 'be finished' I had them look over their rubric to make sure they had met all of the criteria to get a 4 on their magazine. This sent several students back to work to make sure their magazine was the best it could be. 

I am so impressed with the final products that my students came up with. Even though this project took longer than we had planned it freed up time in social studies because we could move on to a new topic while still learning about the American Revolution. They were able to show their understanding of text features and structures through their informational writing, and my students were helping our principal along the way. Once we were all finished we held a gallery walk in our computer lab for all of the students to share their work with the rest of the school. You could not imagine how excited they were to show off their hard work. 


You can click here to look at one of my students magazines. She went above and beyond the call of duty to make this magazine what she wanted it to be. 

I have found that by empowering my students and giving them an actual purpose for projects gives them the drive that they need to complete such large tasks. Several times during our project students wanted to quit, but as I reminded them about why we were competing the projects they changed their mind because they did not want to let our principal down. 

If you have any questions about this PBL feel free to e-mail me. I cannot explain how much my students loved this project and the valuable knowledge they gained through the process! 


Monday, February 22, 2016

Scholastic Magazines

Blog posts two days in a row?! Crazy, I know but I just wanted to pass along a few tips and tricks for those of you who have access to Scholastics Magazines or those of you who are looking to purchase this resource. My school recently bought a subscription to Storyworks and I have been pretty impressed with what I've found so far. 


I've never really used Scholastic Magazines before, but let me tell you I have been impressed with what I have found! My teaching partner and I were looking for some passages that would be rigorous for our students as well as interesting. 


My first trick is that on the Storywork homepage you can get resources for issues all the way back to 2007 - 2008. Its crazy to think I was a senior in high school at that time! Although you can find the resources for these magazines, you can't print the articles themselves. So, if you have been a long time subscriber or a on and off again subscriber this is a great resource for you. My suggestion would be to print off the resources that are provided for the magazines that you have so you will have them for future use. 


Trick number two is that each magazine has a teacher guide that will allow you to download all kids of resources for this issue. I know teacher guides aren't the end all be all, but this would be a great resource for creating sub plans or just getting ideas on how to use the Storyworks magazine. In the teacher guide you can find tips for setting up the lesson, lesson objectives as well as purposes for reading, close reading questions and even differentiation. For first year teachers or even experiences teachers this teacher guide could come in handy! 


Just today I was looking for a passage to practice inferring with my students and I just started browsing Storyworks. I love how each magazine offers different genres, and even grammar and writing practice. I knew I was wanting my feature skill to be inferring so it was super easy to find a passage to meet my needs. Even though the feature skill I will be working on is inferring, I know I can use this passage on so many more things. Each passage also has a content connection and are engaging to students. 


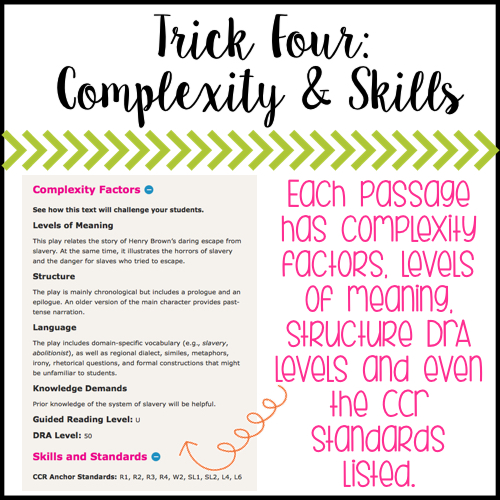
The main reason my team teacher and I wanted to look into purchasing Storyworks was for rigorous passages for our 5th graders. It is so helpful that each passage comes with a complexity factor section that gives information on levels of meaning, structure, language and even DRA levels. It is also helpful to be able to connect the passage to specific standards. 


Last but not least, my FAVORITE trick that I found while exploring Storyworks online resource. Some articles have INTERACTIVE close reading questions and comprehension questions. For the close reading questions there are worksheets with text boxes for students to type their answers. I could see myself using this in Google Classroom for an exit slip or even partner practice. Want to sell this idea to your Principal, just say the words "Paperless Classroom"! 

For the comprehension questions students can complete multiple choice questions. This could be used as a whole class review on the SmartBoard or even as a quick assessment. Did I mention that this was self-grading?! 

I know that I didn't even begin to scratch the surface on what Scholastic Storyworks Magazine provides for teachers but hopefully if you are looking into the resource some of my tips and tricks will help you decide on if thesis right for your classroom or not. I'm interested in seeing how you use Storyworks in your classroom! 

Sunday, February 21, 2016

Peek at My Week: 2/22/16


 Can you believe that this is the last full week of February?! School is flying by and I can't believe I only have a few more months left with my wonderful 5th graders. I'm pretty excited to share with your some of my week! 


Since the school year is going by so fast, its time to really start thinking about the KPREP test, so this week we are going to be doing some math review with this awesome 5 -A-Day Review.  This is such an awesome product that I have the 5-A-Day Language as well. 

For RTI we will be focusing on Prefixes and Suffixes this week and I knew my prefix and suffix task cards would come in handy with my RTI group. For reading and writing we will be finishing up our Revolutionary War Non Fiction Magazines. I got this awesome idea from Mary at Teaching with a Mountain View. I made a few tweaks to make this work for my class and a Project Based Learning Experience. Keep an eye out for a blog post about this soon. My kids have LOVED this experience! 


 Trucking right along we will be continuing our government unit in Social Studies. One of my favorite rescues for Social Studies are the level reading passages from The Sweetest Thing. I have them for almost every Social Studies topic. I find that they are awesome for when I have a sub or need some review. I recently purchased an interactive notebook from Ashleigh and I can't wait to start using it. 

In Math we are beginning one of my favorite topics, fractions! My kiddos will begin with reviewing fractions and working on the "fractions as division" skill. I have fallen in love with the interactive notebooks from Jennifer Findley (I might have all of them) as well as her 5th grade game boards. We will also be using my Valentines Riddles to practice this math skill.

Finally, for Math RTI we will be practicing some new skills as well as reviewing old skills and setting up foundations to learn some new skills! For Math RTI I work with a small group while the rest of my class rotates through centers. This week they will be practicing fractions as divisions with one of my top selling products as well as reviewing volume with my very first digital math resource. Then, Jennifer Findley comes to the rescue with her spoons game for converting mixed numbers and improper fractions and another one of my favorites, her Just Print resource (I might have all of those too!)

What are you up to on this last full week of February? I can't wait to find out. 

Monday, February 8, 2016

Volume of Rectangular Prisms

Happy Monday! 

Don't you just love it when good ideas seem to smack you right in the face? Well, thats what happened to me while I was eating my granola bar breakfast. Last week we started our unit on finding volume of rectangular prisms and while I was getting my granola bar out of the box, ta da! A rectangular prism was staring me right in the face. Then it dawned on me, I could have my students find the volume of rectangular prisms that they see each and every day. 

I spend the rest of my morning searching for rectangular prisms in my classroom, my partners classroom and even my teacher bff's classroom. I found a total of 10 boxes and I knew exactly what what was going to happen during math today. 

After modeling finding the volume of my granola bar box, my students rotated through three centers where they would find the volume of rectangular prisms. 


At the frist center students measured the length, width and height of the boxes using inches. I found that this was a great review for my students how how to property use and read a ruler. Once they got their measurements it was time to find the volume. I did not allow my students to use calculators because I wanted them to review multiplying decimals. 


The second center was similar to the first, but students measured the rectangular prisms using centimeters. Again, this was great practice for using the ruler properly and multiplying decimals. 


Finally, in the third center students measured rectangular prisms with cubes. By allowing my students to work with different sized rectangular prisms using different measurements it was easy for me to see who had mastered finding length, width and height as well as who had mastered the art of labeling the volume of a rectangular prism. 


You can grab the graphic organizer that I used in my classroom here! 


If you are interested in more volume resources, grab my Volume Task Cards Here! This is my very first Digital Google Classroom resource and I can't wait to see your feedback. I hope your Monday was sweet and your Tuesday is even sweeter!